In Rus', in the evenings, entertaining themselves with songs and stories, girls sat for hours at embroidery. They embroidered kaftans, kokoshniks and sundresses. And that craftswoman was valued more whose seam was even. Grooms and their mothers, when choosing a bride, paid attention not least to the sewing she was wearing. If everything is beautiful, neat, and with imagination, then such a girl will be a good housewife and you should definitely take her into the house. So they learned to embroider from their mothers, so that the husband and his family would like them and quickly marry a worthy groom. It’s easier for modern craftswomen. Firstly, they embroider mostly for themselves. Secondly, thanks to the Internet, they can master any technique, for example, a stem stitch. There are many videos on this issue, and modern craftswomen are quickly learning to create entire paintings with threads.
There are many types of stitches in embroidery, but there is also a certain base, basic stitches, namely:
- seam “forward with a needle”;
- seam "stitch";
- buttonhole stitch;
- chain stitch;
- cross stitch;
- Bulgarian cross;
- stem seam.

This article is about the stem suture.
The stem suture is considered one of the most ancient types of sutures. It is very textured and colorful. As a rule, the contours of the design are made using a stem stitch. These can be leaves, petals and stems (by the way, this is where the seam got its name).

It is best to use cotton fabric for the base of embroidery. Before starting work, you need to wash and steam it, this way you will avoid further deformation of the product after finishing sewing.
If you don't have much experience in embroidery, you can use a hoop. They will greatly simplify the work process for a beginning craftswoman.
Seam with threads
The video shows how to make a stem stitch using a needle and thread.
The stem stitch is performed from left to right. The sharp end of the needle constantly points to the left, and each subsequent stitch is taken by stepping back, that is, to the right. On the front surface of the product the stitches overlap each other, and on the back they form a line.

Art does not stand still; each craftswoman adds her own flavor to her work. So today new varieties of stem suture have appeared. Examples of such seams are shown below, and detailed instructions for embroidering them are contained in the video tutorials.
- Portuguese stem stitch.
- narrow stalked seam.
- wide stem seam.
Embroider with bugles
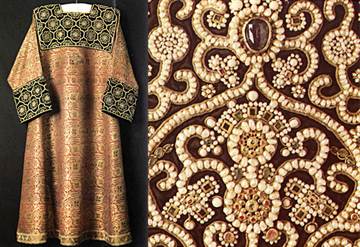
The tradition of embroidering things with beads appeared a long time ago. In Ancient Rus' there were kokoshniks and sundresses embroidered with bugles. A little later, collars and hats began to be embroidered with this material.
This article offers a video tutorial on this ancient technique.
Bugle bead embroidery using the stem stitch technique is the most popular technique, as this stitch is very strong and reliable. It is great for products that are subject to frequent external influences, such as collars, sleeves on clothes, handbags, and so on.

Pillows embroidered with glass beads look very beautiful. This item will be ideal for interior design and will also be a very original gift.

And the technique of making the seam itself is very simple and does not differ much from the seam made with threads.
- We fasten the thread.
- You need to string a bead onto a thread.
- The needle is inserted into the fabric and withdrawn through a gap equal to the width of one bead.
- The thread is again passed through the same bead and the next one is threaded.
- The needle should enter the work after the last sewn bead and come out between the 1st and 2nd.
- The needle passes through the 2nd bead, followed by the 3rd bead.
- The needle should go into the fabric and come out again between the 3rd and 2nd beads.

Working with ribbons
The last variation in the stem seam toolkit is the seam made with ribbons.

The principle of operation is the same as when making a stem stitch with a thread and a needle. Only, as the name implies, ribbon is used instead of thread.
Seam stitch
The stitching on the front side resembles a machine stitch, which is why it got its name. It is performed from right to left. Having secured the thread, make a stitch and pass the needle from the wrong side two stitches forward, while it is important not to tighten the working thread. The top (front) stitches go tightly one after another: the needle is stuck where it came out of the fabric in the previous stitch. The bottom (purl) stitches go halfway back, so the length of the purl stitches is twice the length of the knit stitches.
This seam is used to sew together parts of the product or to lay decorative stitches. The seam is also used in combination with other seams.
 |

 |
 |
In appearance, the stem seam resembles a tightly twisted cord. Each new stitch starts from right to left. The seam looks like a twisted rope, as if cut into the fabric. That's why it is sometimes called "rope". We must try to overlap each stitch tightly with the previous one, but do not jump over it.
The seam is made by moving the needle towards you, laying the stitches away from you. Each new stitch protrudes forward by half the length of the previous one.
When making a stem seam, the working thread should always be on one side - right or left. It is impossible to change the direction of the thread during work, as its structure is disrupted.
The stem stitch is very common in embroidery. It can be used to complete the entire embroidery pattern; it is also used in combination with other seams.

 |
 |
 |
 |
 |
 |
 |
 |
 |
 |


 |
Chain stitch
The chain stitch is a series of identical loops, reminiscent of chain links. The seam is made in any direction, as convenient according to the pattern.
Make a loop stitch as follows: bring the thread to the front side of the fabric, move it from left to right in an arc, insert it into the fabric in the place where it came from, and, holding the loop with the fingers of your left hand, tighten the working thread. This process is then repeated until a series of loops are obtained, emerging from one another in the same direction.
Drawings are made along the contour with a chain stitch. They are also used to fill in patterns, sewing first the line of the pattern along the contour, and then the middle.
When embroidering with a chain stitch, the working thread should not be tightened too much; each stitch should lie freely on the fabric. Holding the thread with your fingers, form the correct and uniform roundness of the loop.
 |
For lovers of satin stitch embroidery, we suggest mastering a simple but very important stem stitch for such embroidery; step-by-step video tutorials will help you understand the details. The stem stitch is the main contour stitch in satin stitch embroidery. This type of embroidery is one of the brightest and most beautiful of all known. This art has been perfected over thousands of years and originates in the East.
In order to learn how to embroider with satin stitch correctly and beautifully, you need to perfectly master the technique of basic seams. Let's take a closer look at the stem seam.
Learning to embroider a stem stitch: video tutorials for beginners
We invite you to watch a video master class that will help novice needlewomen get acquainted with the features of bead embroidery using a stem stitch.
Detailed instructions for making this seam in the video master class will clearly show the intricacies of embroidery.
Instructions for making a stem stitch.
It is believed that this is one of the oldest seams. Very textured seam. All elements of floral motifs are embroidered with it: stems, leaves and petals, branches, which is what gives it its name.
Stem-shaped can be done with ordinary threads, beads and ribbons. It is necessary for embroidering irregularly shaped parts or very complex motifs in artistic satin stitch.
The stem stitch works better on cotton fabric. Before use, it must be washed in a washing machine and ironed. This way you can avoid deformation of the finished product.
If you have no experience in embroidery, use a hoop. With their help it is easier to navigate your work.
Technique for making a stem seam.Consists of oblique stitches, tightly pressed to each other. Embroidered in any direction. The stem stitch is mainly used as an outline in satin stitch embroidery. There are patterns that are completely embroidered with a stem stitch.
Schematically, the stalk suture can be represented as four horizontal points.
You don't have to tie a knot. We simply secure the thread to the fabric, making one stitch with a needle. Embroidery begins at point 1. We insert the needle into point 3. Then the needle emerges at point 2 and insert it into point 4. And so on. The distance between the numbers 1 and 3 is the expected stitch length.
Important! The working thread should always be below the needle. Otherwise, the stitch will turn out tangled and crooked.
The stitches should be very close to each other to give the impression of a complete line.
The tradition of decorating things with beads is a very ancient tradition that existed back in Ancient Egypt. The predecessors of modern beads were small glass beads. They decorated clothes, hats, shoes, and jewelry.

The first historically confirmed canvases embroidered with beads date back to the 9th - 12th centuries.
The culture of bead embroidery was very widespread in Rus', as evidenced by numerous archaeological finds.
Initially, bead embroidery was the privilege of girls from noble and wealthy families, but gradually this tradition spread to the general public. Needlewomen have always been considered enviable brides.
The culture of bead decoration developed. Gradually it became fashionable to decorate not only clothes, but also interior items and furniture. Beads were used to create paintings, boxes, wallets and book bindings.
Bead embroidery is a valuable heritage left to us by our ancestors. Learning to embroider with beads is not easy, for this you need:
- attentiveness;
- accuracy;
- punctuality;
- zeal;
- Perseverance;
- willingness to spend a lot of time on work.
We suggest you familiarize yourself with the technique of bead embroidery using a stem stitch, as it is basic and reliable.
The stem stitch is the densest stitch; according to the technique, the bead is sewn to the fabric twice. It is great for embroidering items that are frequently and actively used: decorations on clothes and pillows, fashion accessories, etc.
Instructions for making a beaded stem stitch.We string beads onto a pre-attached thread. We insert the needle into the fabric and remove it at a distance of one bead. We pass the thread through the same bead again and thread a new one.
The needle enters behind the last sewn bead and exits between the second and first. Next, the needle passes through the second and string the third bead. The needle goes into the fabric and comes out between the third and second beads.
Stem stitch in video and photo tutorialsStem stitch in video and photo tutorials
The stem stitch is one of the most used due to the ease of embroidery. It got its name because stems of different colors are often embroidered in this way. As a rule, it is with this seam that the lessons of experienced craftswomen who teach those who want to embroider begin.
With this seam you can create both the borders of any design and fill it completely, like satin stitch. In addition, it goes well with many other seams: goat,
, counted or printed cross. This is a universal technique, thanks to which embroidery can be created only with the help of this seam, or it can serve as an accent, decoration of some nuances. 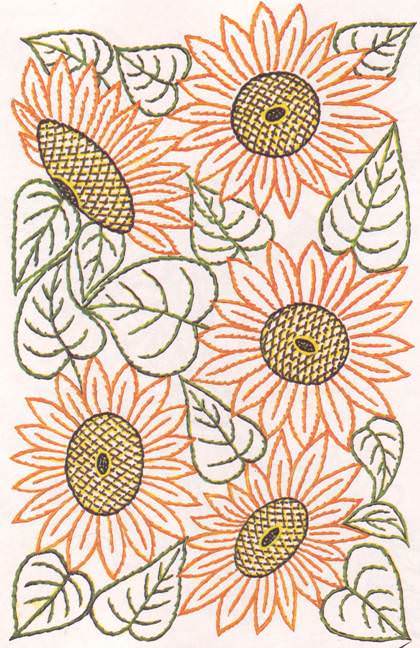


Stem seam technique
According to technology, the stem seam can be divided into two types:
- ordinary;
- compacted

Ordinary stem stitch Both types, like the vast majority of stitches, are embroidered from left to right. In order to secure the thread without knots on the wrong side, you need to make two consecutive stitches on the edge of the outline of the design. Then, according to the sketch, retreat 2-2.5 mm to the right, make the first stitch, under the wrong side, return the needle to the left, pull it out along with the previous puncture. Next, tighten the thread, retreat the same distance again, and repeat the manipulation described above. It is important to ensure that you do not tighten the thread tightly after bringing it to the front side of the embroidery.
The result should be a thin, slightly convex line, as in the photo. 
Compacted stem seam To embroider a compacted stem seam, you need to bring the needle not to the place of the first puncture, but in the middle of the previous stitch. The resulting pattern ultimately resembles a neat little string. Its thickness depends on the thickness of the thread and the length of the stitch.
Photo of such a seam:
As a rule, such a seam is used to make a beautiful hem. To sew it, you should use a thick thread - this will make the seam more impressive.
In other words, the stem stitch grabs the material from the right side. A characteristic feature of this seam is that the thread on the back side is half as long as the one that actually forms the pattern on the front side. That is, each next stitch will extend beyond the previous one by half the length. 
Thus, the seam is sewn by moving the needle towards you, and it is laid in the opposite direction - away from you.
Under no circumstances should you try to make several stitches at a time, which is allowed, for example, when making a “forward needle” seam. This will cause the fabric to tighten and the thread to tangle.
In this type of embroidery, one stitch follows another, so you need to carefully ensure that the thread is always above the needle when performing the next stitch.
A stem stitch will form a beautiful pattern only if each stitch does not differ in size from each other. How long it will be must be decided depending on the thickness of the embroidery thread. The thinner it is, the shorter the stitch needs to be made, and vice versa. The maximum stitch length should not be more than 5 mm.
Also, the stitch length may depend on the pattern. So, on bends the stitches should not be large. Therefore, if there are a lot of them in the selected sketch, you should take this into account in advance and make stitches of the same size along the entire length of the line. If embroidery on curves is done with stitches that are too long, it can ruin the overall condition of the picture due to blurred contours. You also need to bring the needle to the front side along the bend on the side in which it is wrapped. 
To thicken the branch in the floral pattern, gradually increase the length of the stitch, while bringing the needle to the front side slightly lower than the middle of the previous stitch.
If the thread runs out, or you need to start working in another place in the design, you need to insert the needle at the point where embroidery could be continued, bring the thread inside out, circle around several stitches, and cut the thread. When starting the next piece, you can also secure the thread by passing it through several existing stitches on the wrong side.
To make sure that the seam is done correctly, you just need to look at the reverse side: there should be an even stitch, similar to a machine stitch.
It must be remembered that when making a stem seam, it is important to monitor the location of the working thread - it should be either all the time on the right or all the time on the left. If you break this rule, you won’t be able to achieve the desired pattern.
Nuances of preparing for work

Before starting work, it is better to wash the fabric on which the pattern will be embroidered. If this is not done, the material may shrink after the first wash and thus the design may become deformed. It is better to embroider with a stem stitch on pure linen or cotton material. It will not look so organic on the canvas.
To make the drawing more accurate, it is better to copy it onto the front side of the fabric with a simple pencil or a special washable marker. For beginners, it is better to select patterns that have clearly defined limits.
The thread should not be very long, otherwise it will twist and get tangled, which will disrupt the structure and make the embroidery look sloppy.
To summarize, we can highlight the following conditions for a beautiful stem seam:
The stem stitch is also often used in bead embroidery. It helps make the drawing more even and dense.
To do this, you need to fasten the thread to the fabric, take two pieces of beads, string them, insert the needle through two ovals, as in the picture taken, and bring it out between the strung beads. Next, you need to pull the thread through the last bead, add the next one, insert the needle into the fabric through another oval, and bring the needle out between the last two beads. And so on, repeat these steps as long as necessary for the drawing.
If, when you start working, you get the impression that the embroidery is not working correctly, you can watch a video that will help you figure it out.
Video: stem stitch and other types of hand stitches
Comments
Related posts:
 Satin embroidery types and techniques (photos and videos)
Elizaveta Rumyantseva
Nothing is impossible for diligence and art.
1 Mar 2017
Content
Even novice craftswomen can make their outfits unique. You can look irresistible by decorating your blouse with hand embroidery or decorating your dress with ribbons. A simple technique that can be used to achieve this is the stitching of stem stitches. It's easy to learn how to decorate items yourself using this artistic technique.
What is a stem stitch
Decorative contour embroidery has long roots due to its simplicity of execution. A lace stitch, made in a straight, curvilinear line, helps to draw simple patterns on the fabric with threads - flowers, leaves and stems. This is where its name comes from. Craftswomen use such stitches to perform unique:
- ribbon embroidery;
- satin stitch floral patterns;
- complex contour ornaments;
- paintings
To embroider, you will first need to prepare the fabric. After completing the work, the material will not deform or shrink if it is pre-washed and ironed. To make a stem stitch, you will need:
- hoop;
- threads or ribbons;
- scissors;
- thin sharp needle;
- hard pencil;
- carbon paper - transfer the design onto the fabric.

How to make a stem stitch
You can learn how to perform decorative stitching by watching a video, a master class, or reading the appropriate instructions. The technology is so simple that it is not difficult to implement it the first time. It is very important to use stitches of the same size to get a good result. You should follow these steps step by step:
- insert the fabric with the printed pattern into the hoop;
- thread the needle;
- secure it to the wrong side of the material.
Stem stitch embroidery is a counting technique and is performed from left to right. The working thread should always be on the same side. The stitches lie close to each other. Manual stitching is done step by step in the following sequence:
- bring the needle and thread onto the face of the fabric to the starting point of the pattern;
- along the line make a forward stitch 4 mm long;
- pierce the fabric with the needle down;
- pull it out in the middle of the previous stitch onto the front surface;
- repeat the steps from the beginning.
Stem seam - diagram
To make the pattern of the stem seam clear, for a correct understanding of the embroidery technology:
- draw a straight line on the fabric;
- mark 4 points on it at equal distances;
- thread the material into the hoop;
- fasten the thread to the wrong side of the fabric;
- bring the needle up at the first point;
- inject into the fabric in the third;
- pull out from below through the second point;
- inject from above into the fourth;
- pull up through the third point.

Stem stitch embroidery for beginners
In order not to be disappointed in decorative embroidery, beginning craftswomen should not immediately take on complex patterns. Gradual mastery of technology will help you quickly learn handicrafts. It is recommended to first embroider straight branches, simple flowers, and contour designs by hand. There are two types of creating a lace stitch:
- piercing - each is performed by piercing the material with a needle and bringing it out to the opposite side;
- sewing - the fabric is pierced horizontally, 2 punctures are immediately made parallel to the material, then the thread is pulled through.
Embroidering with a stem stitch for beginners is recommended to be done in compliance with the following rules:
- make the stitches equal in length;
- prefer the stitching type of embroidery - the fabric will tighten less;
- for sharp curves in the pattern, use small stitches;
- do not allow threads to twist;
- when working, they should always be on one side - top or bottom;
- The same thread tension is required.
Stem stitch patterns
Beginning craftswomen should start with simple contour motifs. Having mastered the technique, you can find suitable designs for embroidery with a stem stitch in photos in magazines and on websites. To get a high-quality result, you must:
- choose a pattern that you can complete so as not to quit halfway;
- transfer the drawing onto tracing paper;
- transfer it to the fabric or finished product using carbon paper.
Those who know how to sew and draw will be able to independently create and make unique patterns for their clothes. In stores designed for this purpose, they sell magazines for hand embroidery with designs of varying complexity. It can be:
- outline letters;
- animal silhouettes;
- intricate patterns;
- flowers for satin stitch embroidery;
- motives for beads;
- patterns for making with ribbons;
- paintings that are complex in color and content.

How to sew with a stem stitch
When hand embroidering, several types of stitches are used. Decorative stitches in embroidery are recommended, except for the straight version:
- perform work with a tilt to the left;
- obtain a double-row stitch by making a stitch from one point, first at the top, then at the bottom;
- to thicken the line, move each subsequent line back to the left;
- for a thin free stitch, perform any upcoming step with a shift to the right.
Rope embroidery techniques are applicable to the satin stitch technique, when dense filling inside the design is required. The work can be carried out according to two schemes:
- sequentially lay straight rows embroidered in one direction, close to each other;
- for delicate work, use the “split” technique - when returning back, pierce the needle through the thread of the previous step.
Stem stitch with beads
By decorating clothes using beads, you can get exclusive products. The craftswoman will look unique if she is able to sew the outfit herself. A stem stitch back with a needle with beads is performed step by step as follows:
- the thread is fastened from the inside out, brought up;
- 2 beads are strung on a thin needle;
- the fabric is pierced down near the last one.
Subsequent embroidery actions are carried out according to the drawing in the following order:
- the thread with the needle is drawn from the bottom up between the beads;
- is pulled through the last bead;
- the next bead is tightly applied;
- the thread is passed through it;
- the needle is inserted into the fabric down to the right close to the bead;
- stretches out at the top left of it;
- work continues until the end of the drawing.
